Editing Notation
During music entry, or after recording music, it is likely that some editing will be required.
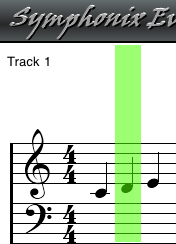
It is possible to select a range of notes, and many of the editing functions work by acting on a selection. Selections work on vertical "columns" of notes where all of the notes that are aligned vertically are in the same "column".
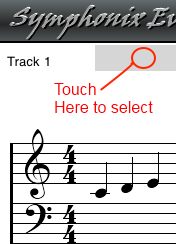
To select a single column:
To select a range of columns:

To select an entire Measure:
To select the entire Song:
Once a selection has been made, touch anywhere inside the selected area to display the Selection Menu:
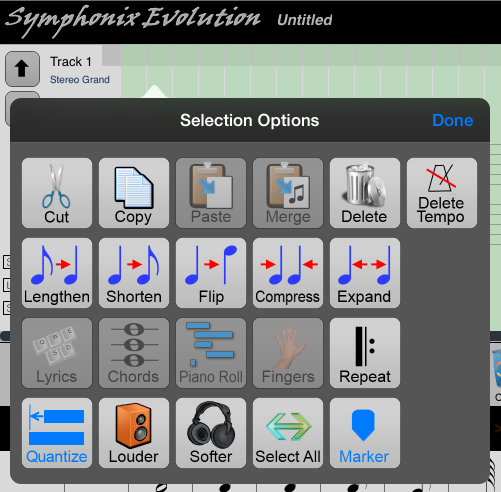
Many functions can be accessed from here:
The Clipboard function allows music to be copied or moved. From the Selection menu:
Deleting a Selection will remove the highlighted notes and shift the following notes so that they fill the gap. To delete a selection:
Sometimes it is desirable to delete all of the notes in a selection, but leave the space clear so that new notes may be entered without disrupting the following parts of the score:
To make room for new notes in the middle of an existing piece of music:
Selecting a Group of Notes (Rectangular Selection)
Use the Select button
![]() on the main toolbar to draw a rectangle and select all
of the notes that it contains. First enable Select mode by tapping the
button once (the button will light up). Now tap over the top left corner
of a rectangle and drag to highlight one or more notes. If the rectangle
contains notes a menu will appear:
on the main toolbar to draw a rectangle and select all
of the notes that it contains. First enable Select mode by tapping the
button once (the button will light up). Now tap over the top left corner
of a rectangle and drag to highlight one or more notes. If the rectangle
contains notes a menu will appear:
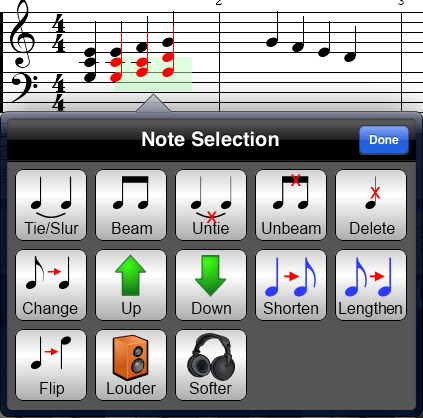
The selection menu allows various functions to be performed against the highlighted notes:
| Tie/Slur | Ties the notes together. Use this option to
quickly tie the lowest or highest notes in each selected column
depending on the note stem direction. |
||
| Beam | Beams notes together in a single step |
||
| Untie | Removes all ties or slurs connecting the selected notes |
||
| Unbeam | Removes any beaming from the selected notes |
||
| Delete | Deletes the notes |
||
| Change | Changes the note lengths to the current note symbol |
||
| Up/Down | Transpose up or down by one semitone |
||
| Shorten/Lengthen | Halve or double note durations |
||
| Flip | Flip the note stem direction |
||
| Louder/Softer | Increase or decrease the note velocity by 10% |
Deleting a Single Note or Rest
To delete a single note or rest:
To delete a Measure, use the same procedure as that used to add a Measure. Dragging a measure over the top of an existing measure will remove that measure.
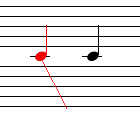
It is possible to edit the properties of a single note or rest:
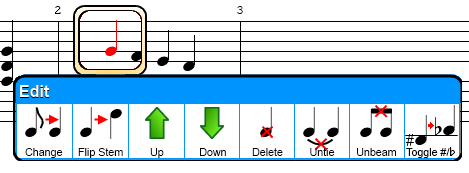
| Change | Changes the note symbol to that of the current
symbol. For example, if the note was entered originally as a
quarter note and it is necessary to change it to an eighth note,
first select the eighth note as if a new note is to be dragged into
the score. Then use the Edit Note function to Change the
existing note to the new symbol. |
| Flip Stem | Toggles the note's stem direction from up to down,
and vice versa. |
| Up | Transposes the note up by one semitone. |
| Down | Transposes the note down by one semitone. |
| Delete | Deletes the note (this is an alternative to
dragging it to the Delete button on the main toolbar) |
| Untie | Unties the note if it is tied to another note. |
| Unbeam | Unbeams the note if it is connected to another
note. |
| Toggle #/b | Toggles the note enharmonic from sharp to flat, or flat to sharp |
It is possible to transpose the entire song or just a selection:
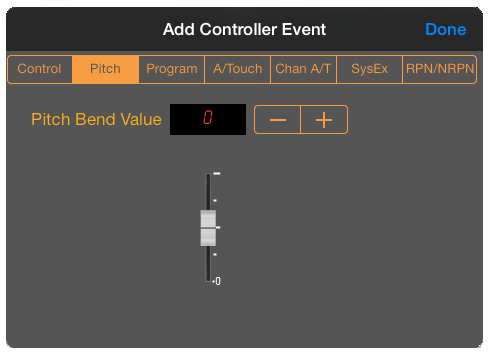
Use the Controller Button ![]() on the main screen to add or edit MIDI Controller events.
on the main screen to add or edit MIDI Controller events.
MIDI Controller events can be inserted into the song in two different ways:
1. Touching and dragging from the Controller button on the main screen to a column in the music
2. First selecting the column and then touching the Controller button.
Dragging a Controller Event into the score
It is easy to place MIDI controller events into a song by pressing and holding the Controller Button on the main toolbar and dragging the controller directly into the song. This will open the Controller entry panel:
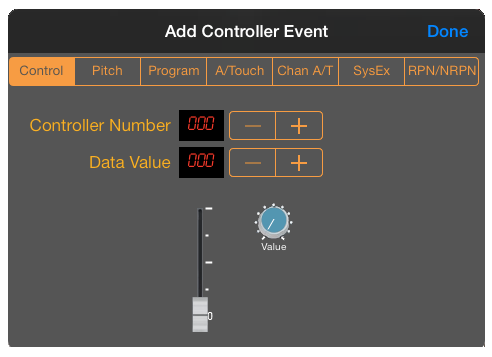
Use the "Copy Synth Parameters" button on the RPN/NRPN panel to insert the current Synth Parameters into the song.
Editing Controller Events for a Selected Note Column
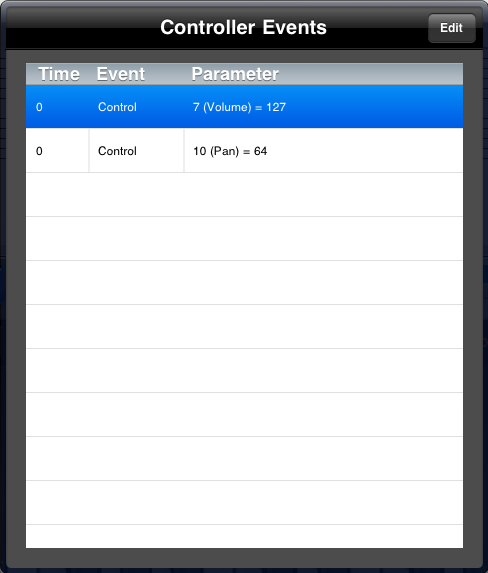
Selecting a column and pressing the Controller button will open the Controller Panel to display the MIDI continuous controller events for that position in the song:
This option is designed to give precise control over the events and assumes a knowledge of how MIDI works. (The Piano Roll view also contains a graphical MIDI Controller Editor that can be used to make rapid adjustments, especially for pitch bend etc).
The columns displayed are:
Touch the Edit button to delete or add events in the list:
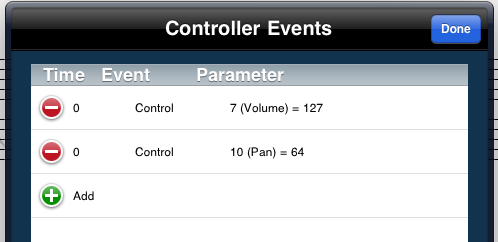
Click the Add button to create a new Event:
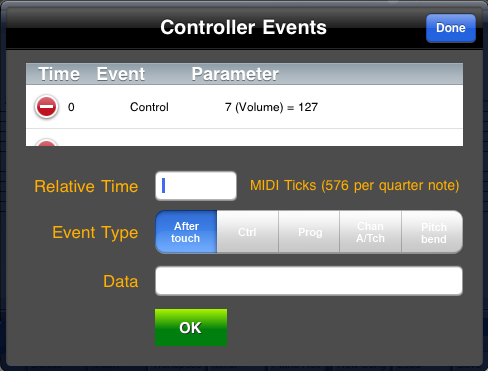
Enter a Relative Time, Event Type and Data in the spaces provided, then touch the OK button to save the changes.
Each event type requires different Data, entered as one or more comma-separated values. All values are in decimal:
| Event Type | Data | Example |
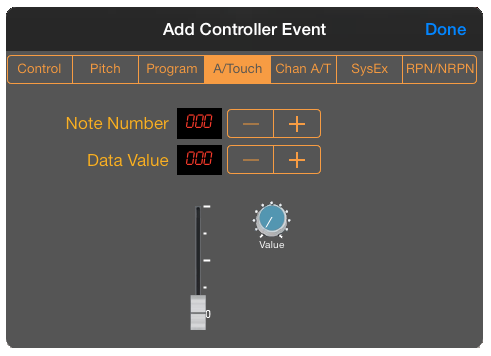
| Aftertouch | The MIDI Note to which aftertouch is to be applied, followed by the aftertouch value | 60, 45 |
| Control | A MIDI Controller ID and data value. | 7, 127 |
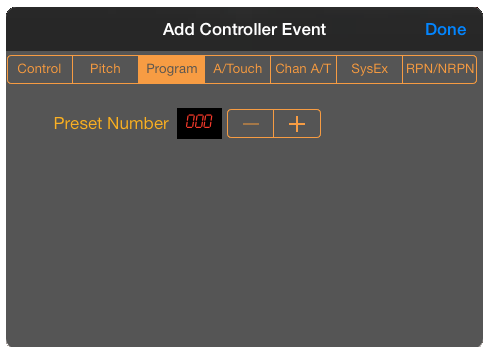
| Program Change | A MIDI program change (preset) number, from 0 to 127 | 54 |
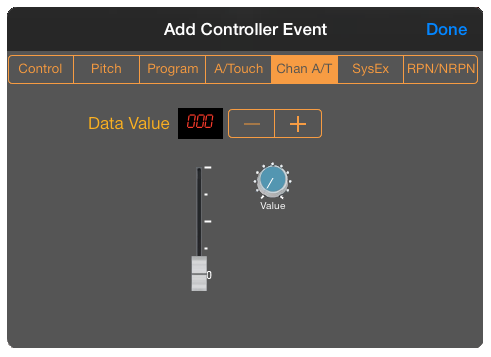
| Channel Aftertouch | An aftertouch value to be applied to the channel | 45 |
| Pitch Bend | A pitch bend value from 0 to 16383, where 8192 represents "centred". Symphonix sets the pitch bend range to +/- 2 semitones by default. | 8192 |
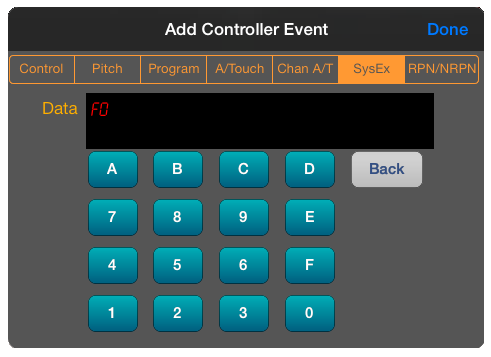
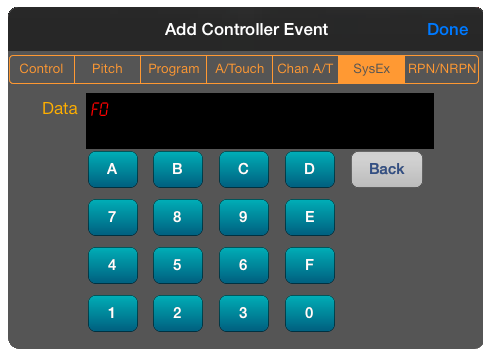
| SysEx | A MIDI System Exclusive message. Data can be entered directly, or selected from a list of device messages (if defined) | F0 41 32 00 06 00 F7 |
To delete an existing event, touch the
![]() symbol next to
the event, followed by the
symbol next to
the event, followed by the
![]() button.
button.
The last editing change can be reversed using the Undo function. Use the
File ![]() button on the main
toolbar to open the File Management menu, and choose the "Undo Last Action" option to undo the last editing change.
Choosing "Undo" again will restore the state back to what it was before Undo was
used.
button on the main
toolbar to open the File Management menu, and choose the "Undo Last Action" option to undo the last editing change.
Choosing "Undo" again will restore the state back to what it was before Undo was
used.
Note: When Step Time recording is active, Undo will restore the state back to what it was prior to activating record mode. The Undo state is not kept for individual note entry in this mode. Similarly, when Real Time recording is active the Undo function will restore the entire track back to what it was prior to recording.