
Song Settings
The main area of the screen is used for entering music notation, and various song parameters can be setup using the tools on this page.
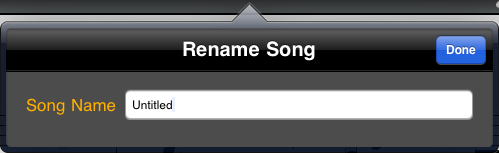
The Song Title sets the name of your song, and is displayed at the top of the screen. When you first start Symphonix it defaults to "Untitled".
Touch the title to enter a new value, followed by Done:
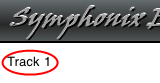
Touch the Track Name in the top left corner of the screen to open the Track Manager:
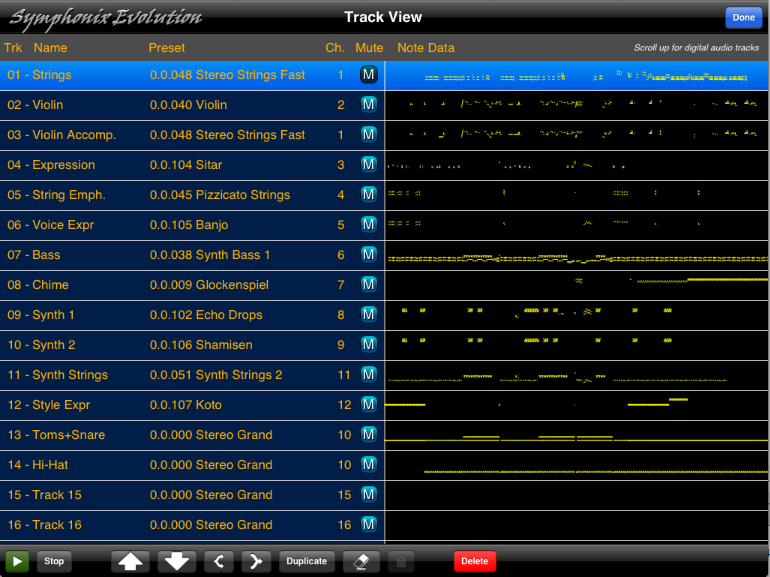
From the Track Manager it is possible to:
The first 16 tracks are for MIDI. Scroll past these to access an additional 8 tracks of Digital Audio.
During playback, the current position in the song is indicated in the Track display. Touch and drag this indicator to quickly move the playback cursor anywhere in the song.
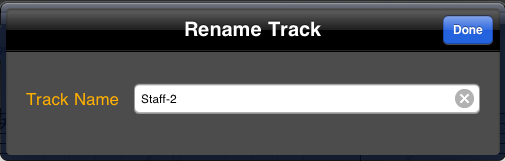
First open the Track Manager, and touch the title of a track to enter a new name:
First open the Track Manager, and touch the Preset or MIDI Channel for a track to change the settings directly without leaving the Track Manager screen.
Use the "Up" and "Down" arrow buttons on the Track Manager screen to move the currently selected track up or down in the track order. This function can be used to rearrange the track order, for example when arranging multiple parts.
It is possible to split a track into two, by using a "Split Point". The Split Point is a note, and everything above the split point will move to one track, and everything below it will move to a second track.
First open the Track Manager, and use the
Split icon ![]() to open the
Split Track function:
to open the
Split Track function:

First select the "Split Track", which is the track to be split into two.
Next, select a Split Point by choosing an appropriate note and octave. The default is C4, which is middle "C".
Choose an Output Track. Everything below the Split Point will be moved to this track, and all notes above the Split Point will remain in the original track.
Use the "Re-Score" option to determine whether the existing notation should be copied "as is", or rescored to include rests. If this option is ON (the default) then the original note timing will be preserved along with all notation symbols. If this option is OFF then both tracks will be re-scored as if they were imported from separate MIDI files. This preserves the timing but will result in a loss of some notation symbols such as coda, custom text and lyrics.
Two tracks can be combined into a single track with the Merge function.
First, open the Track Manager and touch the Merge button
![]() :
:
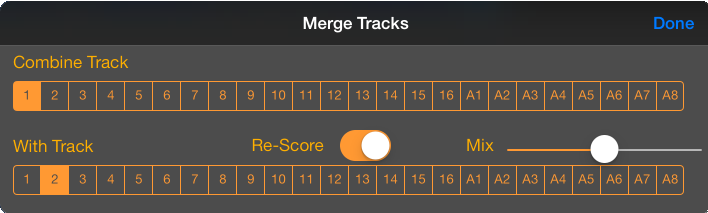
Select the two tracks to be merged. The "Re-Score" option may be used to combine the notation of each track without any regard to placement or timing (this preserves all existing arrangements). Turn the "Re-Score" switch to the ON position to re-notate the track as if the notes have been played together. This will preserve timing, but will change notation symbols to accommodate the adjustments.
The Track Manager can be used to quickly make an exact copy of a track. First highlight the track to be copied, and press the Duplicate button at the bottom of the screen:
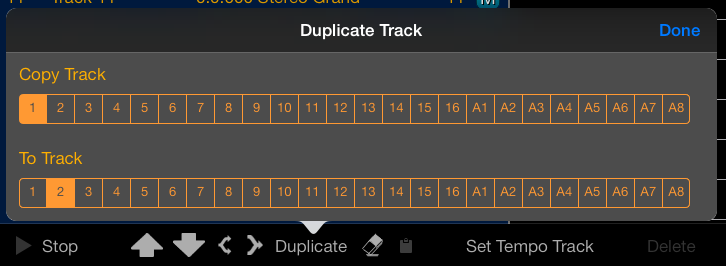
The Duplicate function will overwrite the destination track and replace it with an exact copy of the source track.
Open the Track Manager, and use the Erase button
![]() to empty the contents
of a track.
to empty the contents
of a track.
The Clef for each Track is displayed on the left side of the Notation:
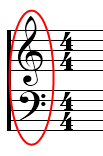
Touch the clef symbol to change it:
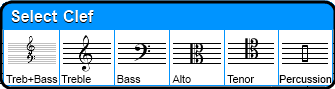
Symphonix Evolution will automatically transpose existing notes onto the new clef.
Note: The treble and bass clefs can indicate 8va/vb and 15va/vb if the track has been transposed up or down by one or two octaves.
The Percussion Clef is a special mode that allows Device Percussion Key Maps to be used. This takes advantage of MIDI drum kits where each note has a different sound.
In Percussion mode, each line of the staff can be defined to represent a specific note and symbol.
Follow these steps to use the percussion clef:
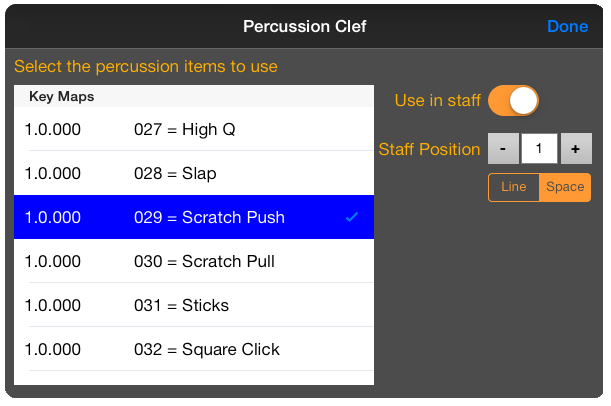
Highlight the sound that you want to use in the staff, and switch the "Use in Staff" box to the "ON" position. The Staff Position will be automatically set based on the Device Manager setup, but may also be changed here if you would like to use a non-standard placement.
The Time Signature of the music is displayed on the left side of the Notation:
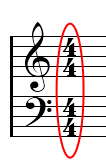
The time signature defaults to "4/4" (4 beats per measure, each beat is a
quarter note). Change it by pressing the Time Signature button
![]() on the Toolbar.
This will open a panel that has a set of different time signatures to choose
from:
on the Toolbar.
This will open a panel that has a set of different time signatures to choose
from:
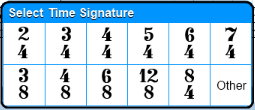
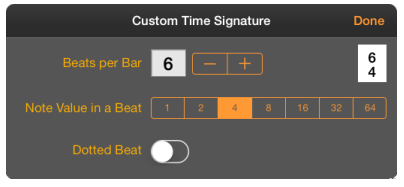
Use the "Other" option to create a custom time signature:
Note that changing the Time Signature will not cause existing music to be rearranged and measure positions will need to be manually edited after making this change - It is a good idea to be sure of the correct time signature before entering too many notes into the song!
The Key Signature for the song is displayed on the left side of the Notation,
before the Time Signature. To change the Key Signature, touch the
![]() button on the Toolbar.
This will open a panel that has a set of different key signatures to choose
from:
button on the Toolbar.
This will open a panel that has a set of different key signatures to choose
from:
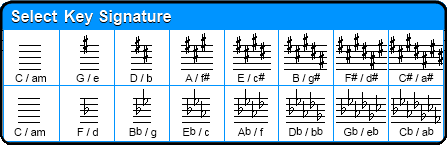
After selecting a new signature, any existing notes will be re-scored so that the accidentals (sharps and flats) are in the new key.
The current Tempo is displayed above the Virtual Synth Keyboard:
![]()
Touch the tempo to display a control panel:
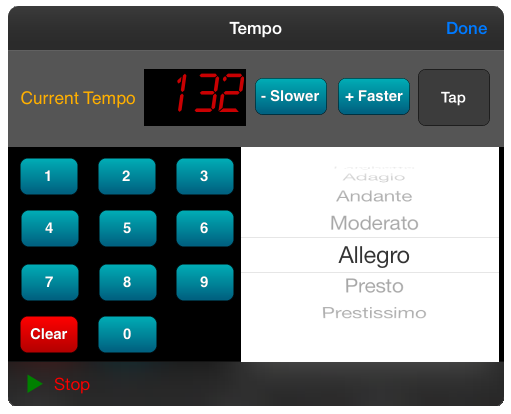
Use the number keyboard to enter a tempo directly, or scroll the list of commonly-used tempos. Alternatively, use the "- Slower" or "+ Faster" buttons to decrease or increase the current tempo.
Alternatively, the Tap button can be used to tap a tempo in time with the beat.
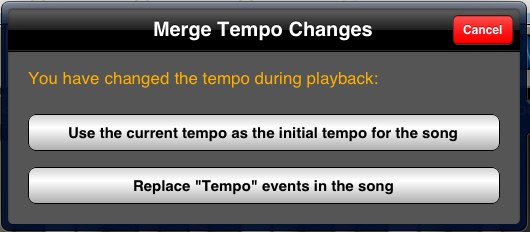
If the tempo is changed while the song is playing and the Stop button is pressed before the song ends, the tempo changes can be saved back into the song.
After a song includes tempo change events they can be edited using the Controllers function of the Piano Roll.
Normally tempo change events are saved to Track #1, but it is possible to change this to a different track at any time. This makes it possible to temporarily alter the tempo to see what effect it has on the music. For example, a teacher might use this feature to do beat and rhythm training by allowing a student to tap the tempo while a song is playing, then switch to a different tempo track to hear the original tempo.
Change the tempo track by using the Track Manager. Select a track so it is highlighted in the track list, and then press the "Set as Tempo Track" button to make that track the new tempo track.