MIDI Control
The MIDI Control function allows external devices to control functions in Symphonix Evolution. For example, a fader or knob control on an attached MIDI controller might be used to select a track or scroll through the song. Other apps supporting "virtual MIDI" are also supported.
Functions that are able to be controlled are:
Drum pad
Track selection
Mute and Solo
Transport controls, Play, Stop and Record
Play List track and album selection
Undo
Song position
Pad selection
Arpeggiator Control
Linking MIDI controllers to Symphonix Evolution
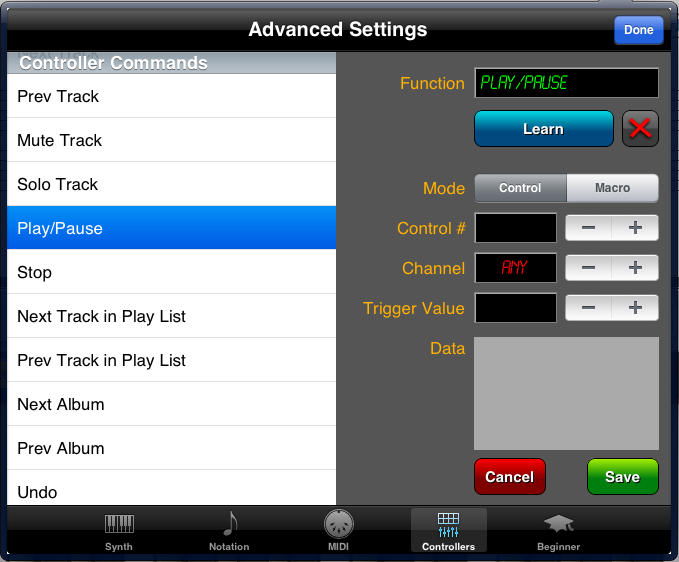
Connect an external MIDI controller by using the "Controllers" tab of the Advanced Settings screen:
The left side of this screen is a list of app functions that can be controlled. When a function is highlighted in the list, the right side of the screen displays the settings for that function.
To assign a controller:
Select the function you wish to control in the "Controller Commands" list
Use the Mode button to choose between a MIDI Controller event or other MIDI data (such as System Exclusives and MMC)
If the Mode is set to "Control":
Select the MIDI controller number from 0 to 127
Select the MIDI channel on which the message will arrive, or use "Any" to listen to all channels
Use the "Trigger Value" to choose the MIDI controller value that will result in the App function being called. For example, a toggle switch or pedal (on/off) controller might use a trigger value of 127 to indicate that the App function should be called when the controller is in the "on" position, and 0 for the "off" position.
If the Mode is set to "Macro", use the "Data" panel to enter MIDI data. The App will listen to the MIDI input devices and will trigger the function as soon as it sees a match to the data specified here.
Press the "Save" button to store your changes.
Controller Commands
Controller commands are:
| Pad 1 to Pad 8 | Trigger the drum pads 1 to 8 |
| Select Track 1 to 16 | Allows individual tracks to be selected |
| Next Track | Selects the next track |
| Prev Track | Selects the previous track |
| Mute Track | Mutes the current track |
| Solo Track | Sets the Solo mode for the current track |
| Play/Pause | Starts Playback, or Pauses |
| Stop | Stops Playback |
| Record Start | Start Real Time Recording |
| Step Record Start | Start Step Record mode |
| Step Record Stop | Stop Step Record mode |
| ARP Toggle | Turns the Arpeggiator on or off |
| ARP+Hold Toggle | Turns the Arpeggiator on or off, and also sets ARP Hold mode. |
| ARP Hold/Unhold | Sets or clears "Arpeggiator Hold" mode |
| Next Track in Play List | Skips to the next song in the Play List |
| Prev Track in Play List | Skips to the previous song in the Play List |
| Next Album | Skips to the next Album in the Play List |
| Prev Album | Skips to the previous Album in the Play List |
| Undo | Undo the last editing change |
| Redo | Redo the last editing change |
| Save | Save the current song |
| Load | Loads a new song |
| Clear | Starts a new song |
| Reset MIDI | Resets the internal Synth and external devices |
| Prev Page | Scrolls to the previous page |
| Next Page | Scrolls to the next page |
| Pad = Large Keyboard | Activates the full keyboard view |
| Pad = Symbols | Activates the symbol pad view |
| Pad = Small Keyboard | Activates the small 88 key keyboard view |
| Pad = Rhythm Generator | Activates the rhythm generator view |
| Pad = Drums | Activates the drum pad view |
| Pad = Chord Sheet | Activates the chord sheet view |
| Pad = Fret | Activates guitar fret view |
| Pad = Tab | Activates guitar tablature view |
| Pad = Lyrics | Activates lyric pad view |
| Pad = Marker | Activates marker pad view |
| Scroll Position | Scrolls to a song position. Use the FADER value where the controller value determines the position: 0=the start of the song and 127 is the end |
| Selection Position | Selects a single note column anywhere in the song. Use the FADER value where the controller value determines the position: 0=the start of the song and 127 is the end |
| Marker Position | In Step Record or Lyric Entry mode, sets the "current" editing (cursor) position. Use the FADER value where 0=the start of the song and 127 is the end. |
| Playback Position | Identical to "Scroll Position" except if the song is playing, in which case playback skips immediately to the selected position. |
| Go to Marker | Navigates quickly to a marker. The controller value determines the marker that will be selected: 0=Marker #1, 1=Marker #2, etc. |
The MIDI Learn Function
The "Learn" function simplifies controller assignments by automatically setting the correct Mode and input parameters based on MIDI input. Use the Learn function as follows:
Select the function you wish to control in the "Controller Commands" list
Press the Learn button
On the external MIDI device, press the pedal or controller to be linked to the App function. The controller number or MIDI data should be visible on the screen.
Manually edit the Trigger Value if required
Press the "Save" button to store your changes.
Tip: If responding to a pedal or controller on/off switch, hold down the pedal or switch so that it is in the "ON" position and press the Save button in the app. This will cause the "Trigger Value" to be set to the current controller value and correctly record the "on" position of the controller.
Faders
Some App functions respond to "fader" events where a Continuous Controller message can be used to determine multiple trigger values. For these events, setting the Trigger Value to "FADER" will allow the continuous controller value to be used. The "FADER" position can be found immediately after the value of 127 (i.e. as if the trigger value is 128):
| Function | How it works with Fader control |
|---|---|
| Next Track | Selects a track from 1 to 16 based on the controller value. This is ideal for using a hardware knob control to quickly switch between tracks. In this mode there is no need to setup separate "Select Track" assignments or a "Prev Track" command. |
| Prev Track | Selects a track from 1 to 16 based on the controller value, similar to "Next Track". |
| Scroll Position | Use the MIDI hardware controller to calculate a screen scroll position. This is ideal for using a hardware knob or fader control to quickly move to any position in the song. |
Switches
Some MIDI controllers transmit continuous messages while active. For example, a controller might have a pad that sends continuous touch velocity information for the duration it is held down. These controllers are difficult to map to "on/off" or selection functions.
The SWITCH mode allows Symphonix Evolution to deal with these types of controllers, by functioning as a Latch: When the controller is first activated Symphonix will send an "ON" message. All subsequent controller messages are then ignored until the controller stops transmitting. This makes it possible to use velocity-sensitive controller pads as momentary switches for triggering functions within the app.
To activate Switch mode, set the Trigger value for a controller to 129. The display will read "SWITCH".